


Rolling a joint is an important piece of knowledge for any cannabis connoisseur. Here’s everything you need to know about rolling the best joints, utilizing advanced techniques, and how you can start rolling joints yourself as a beginner.
How much weed should go into a joint?
A standard-sized joint contains less than a gram of cannabis with an average joint holding about 0.33 grams. However, you can use more or less depending on the size of the joint paper you’re using. Extra large joint papers are available and can hold more than a gram of weed. The amount of weed you will need to use also varies based on the type of flower you’re using. Fluffier buds will yield a better grind and fill a joint with less weed, though smaller, more compacted buds won’t yield as much.
What do you need to roll joints?
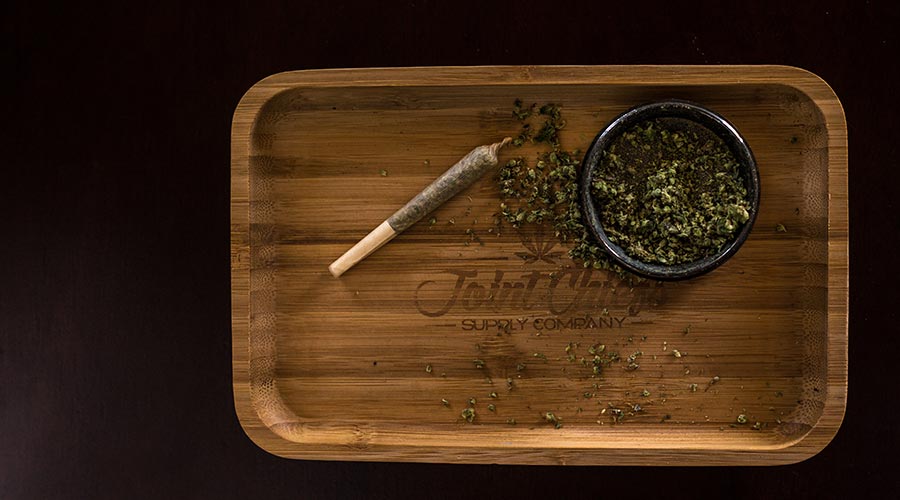
To roll a joint, you’ll need a grinder, some of your favorite bud, rolling papers, and (optionally) a rolling tray. You can also use tips and filters (known as crutches) for a more comfortable smoke, a packing tool for a more efficient burn, and a lighter to spark up with. If you can’t roll by hand and don’t want to learn to do it by hand, you can always use a rolling machine for an easy 3-step joint.
How to roll a joint
You need to know how to roll a joint to get your degree in stoner things. There are so many different ways to do it, including using rolling machines, but we think doing it by hand gives you the most control over the final product. Here’s a step-by-step breakdown on how to roll a joint that burns smoothly and evenly.
1. Grind your bud — Use a grinder to break your bud down into shake, taking care not to overgrind. You want to make sure there are no large lumps, but also that your weed isn’t ground to powder. Drier flowers work best, as sticky ones can gunk up your papers and stick to your hands while you’re trying to roll.
2. Make a filter or use a crutch — Thin cardboard and business cards make great crutches. Simply tear off a strip, fold it in a small zig zag and then roll it into a cylinder. Whether you buy one or make one is up to you, just be sure to add it to one end of the joint before you roll it up. For more detailed information, check out our guide on how to make a crutch.
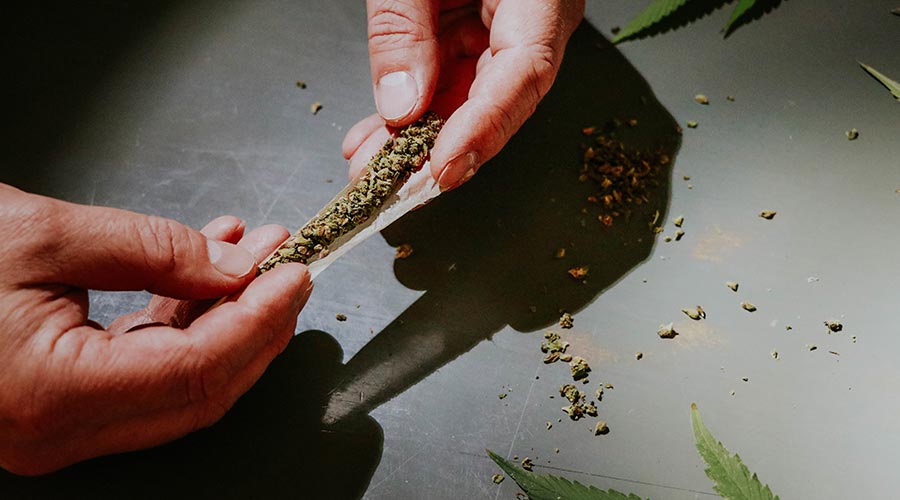
3. Fill the paper with cannabis — Place your paper down on the table or rolling tray, and position the crutch at one end. Then place your ground up bud into the paper. It’s essential to ensure the weed is evenly distributed across the paper to ensure a smooth shape and an even burn. Make sure you don’t leave a gap next to the crutch, as this can affect airflow.
4. Shape the joint — Shape your joint and roll it. Pinch the paper between your fingers and roll it back and forth until the cannabis finds its final cylindrical or conical shape. The aim here is to mould the weed into shape so that it’s easier to roll it into the perfect shape.
5. Roll the joint — Tuck the unglued side of the paper into the roll starting with the crutch side as it’ll help guide the paper as it rolls around it. Lick the glued edge to tack down one side and work your way up the joint until it’s fully sealed.
6. Finish the joint — Stand the joint up crutch side down and pack the end of the joint to ensure it’s as compact as the rest of the joint. You can use a pen or a packing tool. Then close the end of the joint with a twist to prevent it from spilling.
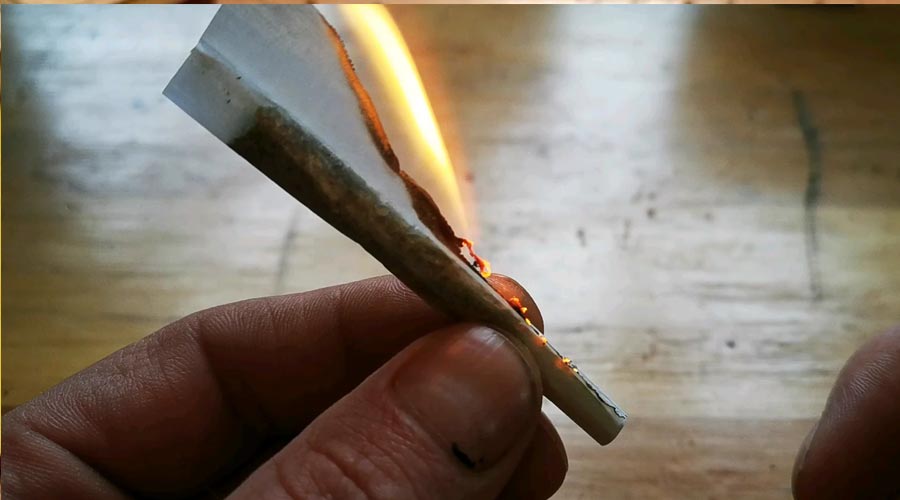
7. Light it up and enjoy — Light the joint evenly for a slow burn by applying indirect heat before inhaling it.
Tips for rolling the perfect joint
The best joints are made carefully using the finest possible papers and packing techniques. Here are a few tips.
Use a good rolling paper
Avoid bleached papers or papers made from wood pulp. Rice or hemp papers taste the best and are much easier to roll with. They also stay lit better and burn a little slower for a more even smoke. You should also make sure to choose a good size. Use large ones if you’re smoking with a group, or small ones for solo sessions and on the go.
Grind your weed to the optimal consistency
If you grind your weed too finely, it’ll turn into dust and burn super quickly. You want a good coarse grind for joints since they smoke better. With too fine of a grind, you’ll find it more likely for your joint to burn unevenly, go out altogether, or be packed too tightly to hit properly.
Use packing tools to evenly space and pack your joint
Packing tools can help you fill in spaces if you’ve already sealed your joint. Take care to avoid packing too tightly or you’ll have a hard time hitting it. Before you seal your joint, make sure your bud is distributed evenly and not clumped together in some places or spread too thin in others, as it leads to an uneven burn.
Use a crutch
Some people don’t use joint crutches, but they’re best for avoiding scoobs and protecting your lips from the heat when the joint starts to get low but you still have weed to go. Also called a filter or tip, a crutch is a mouthpiece made of glass or cardboard wood pulp. You can buy them online or at any headshop, or make your own by rolling unbleached card stock or wood pulp into a tip. If you’re looking to buy one, we highly recommend these Cyclone Crutches from Terp Tube.
Light it evenly
Cannabis and joint papers don’t burn like cigarettes, so you have to light them differently. Rotate the joint and increase the amount of heat to create a slow-burning cherry that can help with a slow, even burn. Without an even cherry, your joints are subject to canoeing.
Advanced joint rolling techniques
There are a few ways to earn some style points when you roll. If you’re looking to break out some new tech, try a few of these more advanced-level techniques.
Reverse Rolling (Backflip)
Known as a backflip, a reverse roll makes for a more even burn and works best with ultra-thin papers. Start by flipping the paper over so the strip of glue is closest to you with the sticky side down. Fill the joint as normal and tuck it. Make sure you don’t leave any slack in the tuck. If it’s too loose, it won’t be easy to correct like it would be with a standard roll. You can use your lips to pull the paper tight, and tighten in a spiral around the tube of bud. Then you just lick and seal. You’ll be able to see that it’s been sealed properly through the paper. At the end, tear off any excess paper and enjoy.
Twaxing
Twaxing just means adding hash or other concentrates to your joint to boost potency. You can roll your joint as normal and dip it in warm hash oil and coat it in kief, or you can pepper some crumbly wax inside the joint before you roll. Rolling is all about being creative, so use the products you like and enjoy more potency and a slower burn.
Cross joint
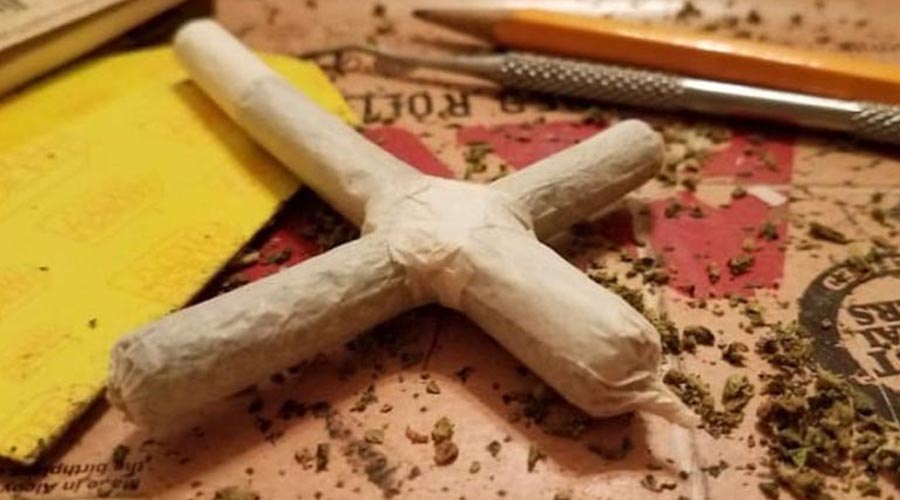
To roll a cross joint, you must first roll a joint using a large full-sized paper and a crutch, then roll a smaller, thinner joint using a small paper without a crutch. Poke a hole through both joints, taking care that the hole in the smaller joint is much smaller than the larger one. Insert one end of the thin joint through the hole of your larger joint and pull it through until it hits the cross shape. Reinforce the intersection by patching the holes on the larger joint and creating a seal with the glue side of an extra rolling paper. Light up all three ends and enjoy.
Tulip joint
Make a long crutch about the length and diameter of a pencil and seal it with rolling papers. Stick two large papers together to form a rectangle, with the glue side facing down on one side. Form a triangle, taking care to leave the glue side uncovered. Wet the glue and seal the triangle. Now, open it into a cone and pack it full of your favorite bud. Crimp the excess paper and place the crutch in the center using the crimped paper to hold it together. Tie a blunt wick or a hemp thread around the crimped end to keep everything together, and voila! A beautiful bouquet of flowers.


