


Don’t let the sci-fi name reference intimidate you; cloning cannabis might seem intimidating, but it really isn’t. With a healthy plant to clone from, clean equipment, and patience, you can copy your favorite plant over and over again. Interested? Read on to learn about the ins and outs of cloning weed, including the benefits of doing so and a step-by-step guide of how to clone a cannabis plant.
What is a cannabis clone?
A cannabis clone is a cutting taken from another cannabis plant and propagated. This process gives you an ability to reproduce a genetically identical copy of the plant you took the cutting from, in a process known as ‘asexual reproduction.’ This means no plant breeding or pheno-hunting.
Reasons for cloning cannabis plants
Want to know two big reasons that cloning weed is a safer bet? No sexing plants and tossing males. No phenotype surprises. No buying seeds or germination required. Cloning cannabis, as opposed to growing from seed, also saves time, space, and money.
When you grow from seeds, you’re running a risk that the plants could all end up male or exhibiting phenotypes you’re not totally stoked with. You eliminate those variables when cloning — and it has the added benefit in predictability. Cloning allows you to create multiple harvests from one plant — ideally your best plants — and, with the bonus of growing a plant with the flavor, cannabinoid profile, yield, growth time, etc., those qualities and characteristics transfer from the “mother plant” (more on that in a minute) to the clones.
What is a cannabis mother plant?
The cannabis mother plant is the plant that you take the plant cuttings from. The “mother plant” genetics are identical to the cuttings, meaning if you love a specific phenotype from a particular plant, the cuttings will generate plants with the same characteristics.
How to clone marijuana
You can clone using a few simple items, or you can go high-tech and use an auto-cloner that utilizes aeroponics to promote root growth. If you’re curious and have the funds, try cloning weed using a few different methods to see what works for you. Note: clones need lots of light — around 18 hours per day — and humidity to flourish.
1. Prepare your growing medium and setup
Preparing to clone weed plants is actually pretty simple. The process requires a few available items at various price points, meaning you can start cloning marijuana plants with minimal investment.
Simply put, you’ll put the clones in a rooting medium that is then set in the tray compartments. The tray compartments sit in another tray that holds water. On top of that goes a dome to keep in the humidity.
Some opt to set the tray on a heat mat to promote root growth further; some skip that part. Generally speaking, to get your setup prepared, you’ll need:
- Scissors (used to take a cutting from the mother plant).
- Razorblade (used to trim the cutting for maximum rooting potential).
- Rooting system (via a tray/dome/rooting medium — like Rockwool, rooting cubes, peat, or foam — or for the fancy-schmancy people, out there, an auto-cloner).
- Rooting hormones (to get that little cutting to grow up nice and strong).
- Un-chlorinated water. Never, ever water your cannabis clones with chlorinated water.
2. Take a cutting
Before you start taking cuttings, determine which plant(s) you want to take them from. Look for plants that appear healthy, strong, and are, at a minimum, eight weeks into their vegetative cycle, or ‘in veg.’ Here’s a helpful list of guidelines:
- Do not take clones off flowering plants.
- Do not fertilize the selected mother plants for a few days before taking cuttings. This process allows the nitrogen to work its way out of the plant’s leaves. This helps “trick” your cuttings to putting energy into rooting before the plant starts growing vegetation.
- Create a sterile environment. Use gloves and clean/disinfected razor blades and scissors when taking clones. Clean equipment thoroughly when complete.
- Select sturdy and healthy-looking branches that are long enough to take cuttings from. When considering branches, the resulting cutting should have at least two nodes on it. Remember, sturdy clones make sturdy plants.
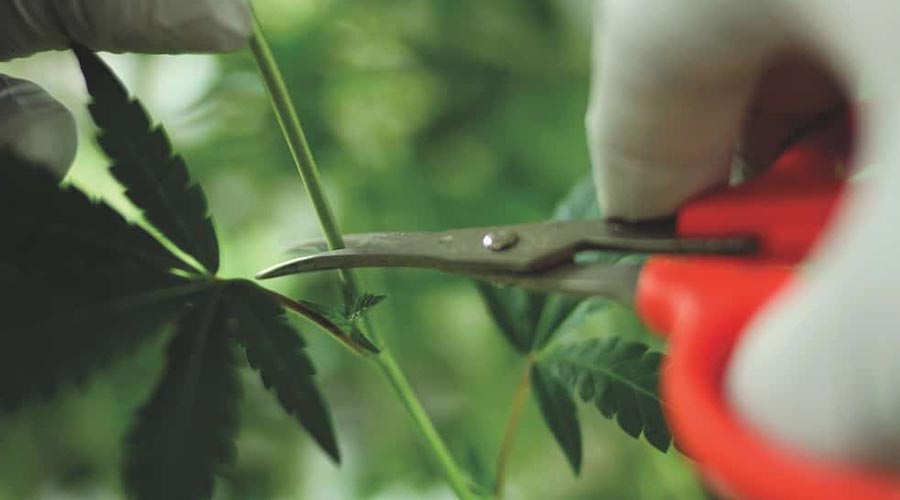
- When cutting the clone, cut above the node on the mother plant. Scissors might be the best tool for the job here; razors can be challenging to get where you want them at this stage.
- Once you have the clone cut, use a razor to cut it to promote rooting. Cut below the bottom node on the clone at a 45° angle to the branch to increase rooting surface area. This promotes faster growth.
- Then dip the cutting into a rooting hormone and place the cutting into the rooting medium. Those using an auto-cloner will put the rooting hormone into the cloner after all the cuttings are prepared.
- Finally, help your clones uptake nutrients and water. Remove unnecessary leaves toward the bottom of the cutting. Use sharp scissors to cut the tips off the remaining fan leaves. These steps will help support photosynthesis. The humidity helps the growing clone absorb moisture through their leaves while developing a root system.
3. Transport your clones
You’ve taken your cuttings and followed the steps as described above. Now we need to ensure conditions promote growth. Check your clones daily, and verify they have enough water by inspecting the bottom of the tray or auto-cloner. Increase humidity (if needed) by spraying non-chlorinated water on the leaves with a spray bottle. Discard any clones that don’t make it. You don’t want to leave decaying plant material in these conditions. That’s how mold can grow and spread.
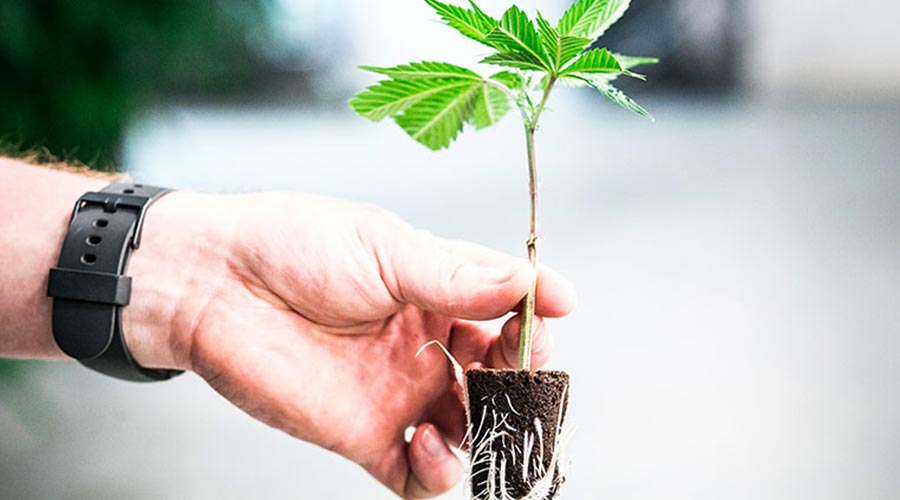
Generally speaking, you’ll know it’s time to transport your clones when they’ve sprouted white roots that are between 1 – 2 inches in length. Most clones are ready to transplant into the soil within 10-14 days, although some may take longer than that. Remember the sterile environment required when taking cuttings from the mother plant? The same rules apply when you’re transplanting your clones. Here’s how to transplant clones when it’s time:
- Stage your pots ahead of time. Put soil in your pots first, and water the soil before transplanting, so the clone doesn’t move around once it’s planted.
- Once the water has drained in the pot, using two fingers, dig a hole 1-2 inches deep, ensuring all roots are buried in the soil.
- While wearing gloves, put the clone into the hole you’ve prepared. Gently cover with soil.
- Look for signs of transplant shock.
How to clone cannabis plants in Rockwool
- Rockwool is extremely popular, and for a good reason. It is widely available, affordable, has fantastic airflow, and retains moisture. It’s also just cool: Rockwool is melted rock spun into fine threads.
- Dampen Rockwool cubes in slightly-acidic water (with a pH around 5.5) for 2-3 hours before adding the cutting.
- Use a pair of sterilized scissors to make small holes in the middle of each soaked cube.
- Obtain your cutting.
- Dip your clone into your rooting agent. Carefully place it into the prepared hole in the soaked cube.
- Place the Rockwool cube with a clone in your propagator or dome. Lightly spray with water to keep humidity high.
How to clone cannabis plants in soil
- Cloning directly into soil generally means you can leave the cuttings in their container until they’ve outgrown it (at least 3-4 weeks). The larger the pot, the longer the clone can remain in that location).
- Prep soil — ideally, a light potting mix containing 25-50% perlite (by volume). Do not use fertilized soil at this point. It can “burn” your clone cuttings.
- Consider party cups as a pot – label with the strain name and date of planting.
- Dip the cutting(s) into your rooting agent and stick it directly into the soil.
- Lightly press soil around the stem to hold the clone in place.
- Transport the cutting(s) into a propagator or dome. Spray with water to get humidity levels up.
How to clone cannabis plants in water
- You can clone cannabis directly in water. This comes in handy if you don’t have access to proper potting soil or Rockwool, and you still want to get your clone game on.
- Fill a narrow glass (or plastic) bottle with unchlorinated water, with a pH of 5.8-6.
- Just like before, take your cutting using sterile practices, dip it in a rooting agent, and place it in the container. Make sure the bottom of the cutting has contact with the water.
- Change the water every 2-3 days. This will prevent bacteria or algae from forming around the clones.
Buying cannabis clones
If you want to skip the steps of cloning marijuana yourself, you can still grow a clone prepared elsewhere. If this is the approach you plan to take, buy from a reputable cultivator. Ask questions to determine if the clone will perform well in your specific situation. Look for healthy clones. They will be vibrant and green with white roots. If a clone has droopy, yellow, or brown roots, move on.
There’s a ton of resources out there. The best part is to explore different techniques until you discover the best method for you.


