


Okay, so you’ve got a beautiful harvest — now what are you gonna do with it? After you cut those babies down, your next step is to dry and cure the flowers. These processes help to boost your flavors, preserve your buds, and remove that unpleasant chlorophyll flavor to make your buds taste and feel the way they’re supposed to. This is probably the most important part of your entire cultivation process, so how do you do it? We’ve got you covered. Check out our all encompassing guide to drying and curing weed below.
What’s the difference between drying and curing?
While the terms drying and curing are often used interchangeably, these two terms actually refer to two different processes entirely. Drying weed involves removing moisture from cannabis flowers so that they can be smoked or vaporized properly. It’s usually the first step before the curing process, which involves slowly maintaining optimal moisture levels over a span of two weeks or more to ensure the flower doesn’t get too dry or grow mold. The curing process makes it so that your weed is shelf stable and lasts longer.
Why drying weed is important
Drying weed is the first step, and it’s important for cutting out all of that unnecessary stuff and removing moisture. When weed plants are cut down, the initial drying process removes moisture, chlorophyll, and other living plant chemicals that affect how your weed tastes. More importantly, it helps to preserve and improve the flavors of your weed.
Fresh flower is still full of excess moisture, sugar, starches, and other nasty stuff like chlorophyll and bacteria which taste bad but can also negatively affect your health. All of that stuff is part of the reason why fresh bud tastes bitter and burns your lungs. The drying process helps to remove all of the nasty stuff and leaves you with a final product that tastes better, feels more potent, and won’t leave you with carcinogenic elements.
Why curing weed is important
The curing process, on the other hand, is just as important. While curing is similar to drying in the sense that it continues to remove moisture and other nasty stuff from your weed, it also influences your terpene profiles and how potent the final product will be. The curing process allows for the flowers to leach the rest of the nutrients out of the branches, allowing for more THCa synthesis and greater potency. However, a good slow cure also preserves natural terpenes which can be degraded from mold, moisture and other environmental factors that can ruin the harvest entirely. The key takeaway here is that a dry helps remove these things, the curing process refines the product to smooth out the cannabinoids and terps and make the weed shelf stable so that you can enjoy it for months after you dry it.
How to dry weed
Drying weed is the easier of the two steps, and there are a few different ways to get started. However, there are a few pros and cons to each method, and it all starts with trimming the flowers.
With wet trimming, you’ll cut your weed into little nuggets immediately after harvest while the smaller leaves are easier to get to. The buds also dry faster in this method, so you get a lower chance of mold. However, this wet trimming means working with sticky fresh plants, which can be a real pain and hard on your tools. Wet trimming may also lead to more chlorophyll in the final product, which makes for harsher flavors. Lastly, wet trimming means different sized buds, so some of them may dry unevenly and might not cure as well as others.
- Check out our detailed guide on how to grow weed indoors.
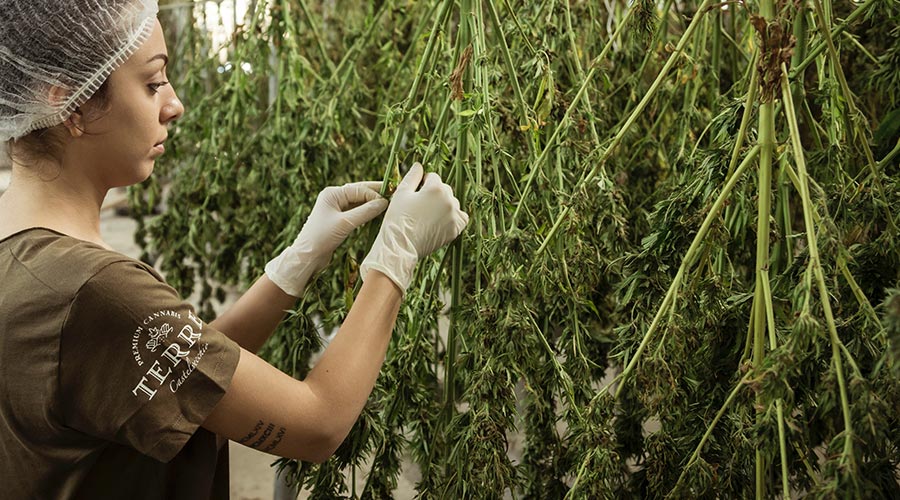
Dry trimming is usually the preference since it’s believed to lead to a better final product. Dry trimming involves cutting the branches down and hanging them up to dry, allowing moisture to find its way out and allow the buds to leach more final nutrients from the branches before being trimmed. These buds are only trimmed after the drying process. The buds dried and trimmed this way usually cure better as they have more time to retain moisture and break down chlorophyll for a smoother end product. The downside is that they take longer to trim and run a higher risk of growing mold. They also tend to need their own dedicated drying room, so they require more space for drying and trimming.
What you need
To start drying weed, you need to set up an area for the drying process. It should be a dark room at room temperature with humidity control. Your drying area should contain:
- A drying rack
- Oscillating fan
- Hygrometer
- Air conditioner
- Dehumidifier
Tutorial
- For wet trimming and drying: you’ll remove all the sugar leaves from your buds immediately after harvest and then place the buds on the drying rack with a fan. Once they’re dry, you can trim them.
- For dry trimming and drying: To dry trim, cut your plant down at its base and hang it upside down in the drying room. Once dry, the plants can be trimmed from their branches and the sugar leaves can be removed. Then you can move on to curing.
- Once you have your plants situated, focus on climate control. The drying area should never exceed 50% humidity or 70°F. You’ll also want to make sure you have a fan blowing to keep the air circulating to help prevent mold.
- Keep an eye on your plants, checking your hygrometer regularly and inspecting your plants for mold. They may take anywhere from 2-7 days, though they can take up to two weeks in some cases. You’ll know they’re ready to cure when you can snap the stems like a twig.
How to cure weed
After your buds are dry, you can trim them and begin the curing process. The cure is essential, since it improves the taste and appearance of your flowers. More importantly, it makes for a smoother smoke. A proper cure with a good burping routine prevents mold and mildew and helps to break down sugars and other plant chemicals to make for more pleasant flavors and smoother smoke. It also sucks the rest of the moisture out of your buds to keep them shelf-stable for over a year.
What you’ll need:
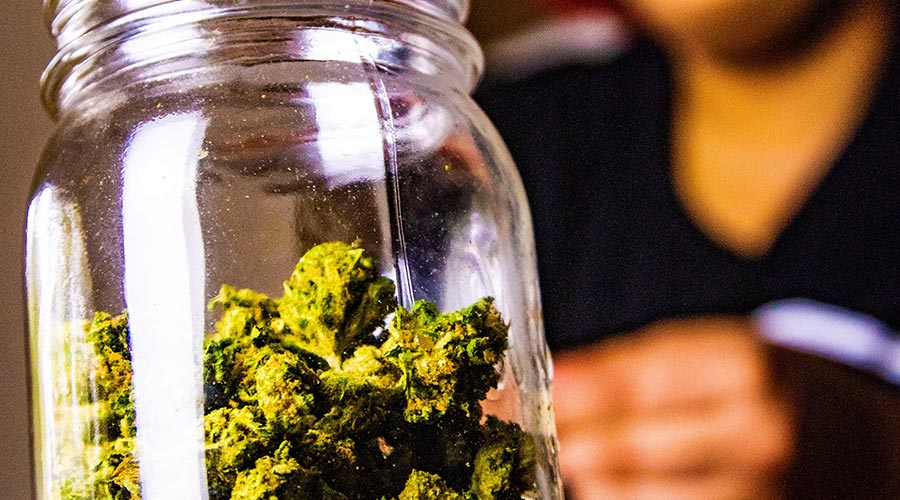
- Glass jars with airtight lids
- Hygrometers for each jar
- Humidity control packs (in dry climates)
Tutorial:
- After buds are dried and trimmed, place them into airtight mason jars no more than 2/3rds full. Store them in a cool, dark place.
- Burp the jars once each day to allow fresh air into the jars, and give the flowers a gentle shake or two to ensure even curing.
- Carefully inspect the buds for mold and mildew, and remove any affected flowers immediately.
- After about four weeks, your buds should be good to go. Some buds may need to cure up to eight weeks, while others may take up to six months. You’ll know they’re done when they smell like a fresh bag of weed.
- If you’re smelling ammonia or mold, your buds were likely not completely dry before you started curing. In some cases they can be saved by burping the jar and letting them breathe for a day. But if the smell persists, it’s best to take the L and not smoke them. You don’t want to smoke mold, mildew or bacteria.
- Once buds are cured, store them in an airtight container away from heat, sunlight, and humidity. If they’re cured correctly, you can store them for more than a year.
Best products for drying and curing weed
Outside some of the essential products we mentioned above for drying and curing your own weed, there’s lots of tech out there to make this process easier on home growers, regardless of the environment. Some products offer an all-in-one solution for drying and curing, like the drying rack system below. Drying systems like these alongside glass jars with humidity regulating packages and your time and attention can take a good harvest into a great final product.
Curing and Drying Weed: FAQs
If you’re just here for a quick refresher on the key takeaways for drying and curing, check out some of these most commonly asked FAQs below.
Q: How long do I need to dry buds for?
Typically, drying takes anywhere from 2-7 days depending on the environment you’re drying in. If you’re in a really dry environment with low RH, it’ll be much shorter than it would be in a humid environment. However, other factors like the size of the buds and whether or not you’re trimming your buds wet or dry can make this process take up to two weeks. Check your branches to determine when you’re ready to cure. If the buds are spongy and sticky and the branches snap like twigs, they’re ready to cure.
Q: How long should I cure weed for?
How long you cure your weed for also depends on numerous factors. The size of your flowers, how you’ve stored them, and the physical properties of the strain you’re curing all play a role. Some strains cure in as little as two weeks, while others can take four to eight weeks. Some strains may even take up to six months. Just keep an eye out for over-drying and mold and make sure to burp the jars regularly to ensure the cure doesn’t ruin your crop. Once your buds feel sticky but dry and have a flavorful, aromatic profile, you can enjoy them.
Q: Does curing improve the taste of my weed?
It sure does! Curing removes the last little bits of moisture from your flowers and helps to break down chlorophyll, which is the stuff that makes fresh weed so harsh and unpleasant to smoke. The curing process finishes your weed off, making it taste and smell better while also making it shelf stable for longer term storage.
Q: What does it mean to “burp” weed?
Burping refers to the release of moisture and gaseous buildup that comes from curing your flowers in a sealed jar. When you’re curing, the jars need to be opened up every couple of days to release the nasty stuff and replenish oxygen — that release is called “burping.”


Any comment on using grove bags to cure or dry and cure?